

Overview
Preamble
I am not a web developer. I’ve blogged in the past, messed around with html a little and conceptually understand style sheets, but that doesn’t even bring me close to being capable of launching a website on my own.
And yet, I built this a healthy portion of this website, on my own, primarily using git, markdown, html and css. Right now, I’m writing this in RStudio, and I’ll build, test and deploy this post there too. In fact, at this point, I’m pretty sure I won’t have to seriously investigate any more css or html as long as I don’t get bored with my code syntax highlights (MOAR PRETTY COLORS) and stay happy with my analytics toolkit.
That’s right. This blog is written, tested and managed almost entirely out of RStudio using almost nothing more than Rmarkdown. Can your IDE do that? (OK, it probably can, but it’s probably not a full fledged statistics workbench too. Except Eclipse. And ESS. And Vim. And a bunch of others. But still…)
Even better, if I end do up deciding to edit the various template files that generate this website, RStudio has enough basic features to write the html I need. This includes simple code completion, syntax highlighting and file browsing. How cool is that?
This post will cover the process, failures and little amounts of code that wrote to get this blog up and running. Since I’m not a developer, a lot of this might not make much sense. It doesn’t always make much sense to me. But it is a working webpage (I think?) stored and edited locally with tools familiar to most statisticians. If that something that suits your fancy, please read on.
The plan
Every good project starts with a good plan, and this one is no different. When putting this site together, I was looking for a few things:
- A static webpage hosted through Github pages
- A pretty, minimalist theme
- Decent syntax highlighting that works well with R
- An installation of Google Analytics
- Getting Disqus installed
- RStudio integration
It took a long weekend, but I eventually nailed down every component.
Working with Github Pages
A static webpage is different than a lot of blogging solutions. Instead of using an online content management system that connects to a database, you have a complete hosted version of your webpage online and a complete local copy on your computer. The local copy is used for building additional pages and testing. Whenever you’re ready to put these local changes online, you push the local version of the server. We’ll do this step using git, the little version control system that has become the software that builds software and we’ll host the page using Github pages.
If you own a Windows machine, you can install git by grabbing the Github for Windows Desktop Client or the standalone Git client. Basically all Linux distros come with git, and you can always get the most recent version through your package management system.If you own a Mac, like me, you already have git installed, but I prefer to grab the most recent version from Homebrew.
Once Homebrew is installed, you can install the latest version of git with the following:
brew install gitTo get started using Github pages, you need a Github account. That process starts here. Github has a very nice guide to setting up git. That’s here, and there’s some very cool tutorials available to get you up to speed using version control:
- A great place to start is TryGit, by Github
- And most of that material is covered in Hello World, also by Github
- Peter Cottle has a separate guide to Git Branching, which is super cool
Now that we’re more familiar with git, we can get started with our static webpage. You have the option of creating a personal page or a project page, but I’m showing the former. The brief tutorial on Github pages shows how you can create a site from scratch, but we’re going to skip around most of that. Instead, let’s go pick a theme. It can do most of our work for us.
Jekyll and Themes
Github pages support Jekyll, a tool for creating static webpages and blogs from text. It’s built in Ruby, which seems like a really awesome language. But that’s about all I can say about Ruby. Don’t worry, we’ll still be working in our precious R. All the Ruby we need is a couple of stuff in the command line.
To install Jekyll, run the following in your terminal. The first call to Homebrew gets us an updated Ruby, and the second gives us Jekyll.
brew install ruby
gem install jekyll
Since git is an integral tool in managing our webpage, we’ll bootstrap its ability to share projects to get all of the components we need for a website. Fortunately, Jekyll has a variety of themes for us to take advantage of. There’s no reason to reinvent the wheel when we don’t have to. I went with Minimal Mistakes by Michael Rose. All of that beautiful design you see right now is his work. Thanks Michael!
Launching the theme is as simple as forking his Github repository and deleting some of the extra branches. That link will do the first part for you, and the “branch” window lets you get to any other branches floating around (red pointer).
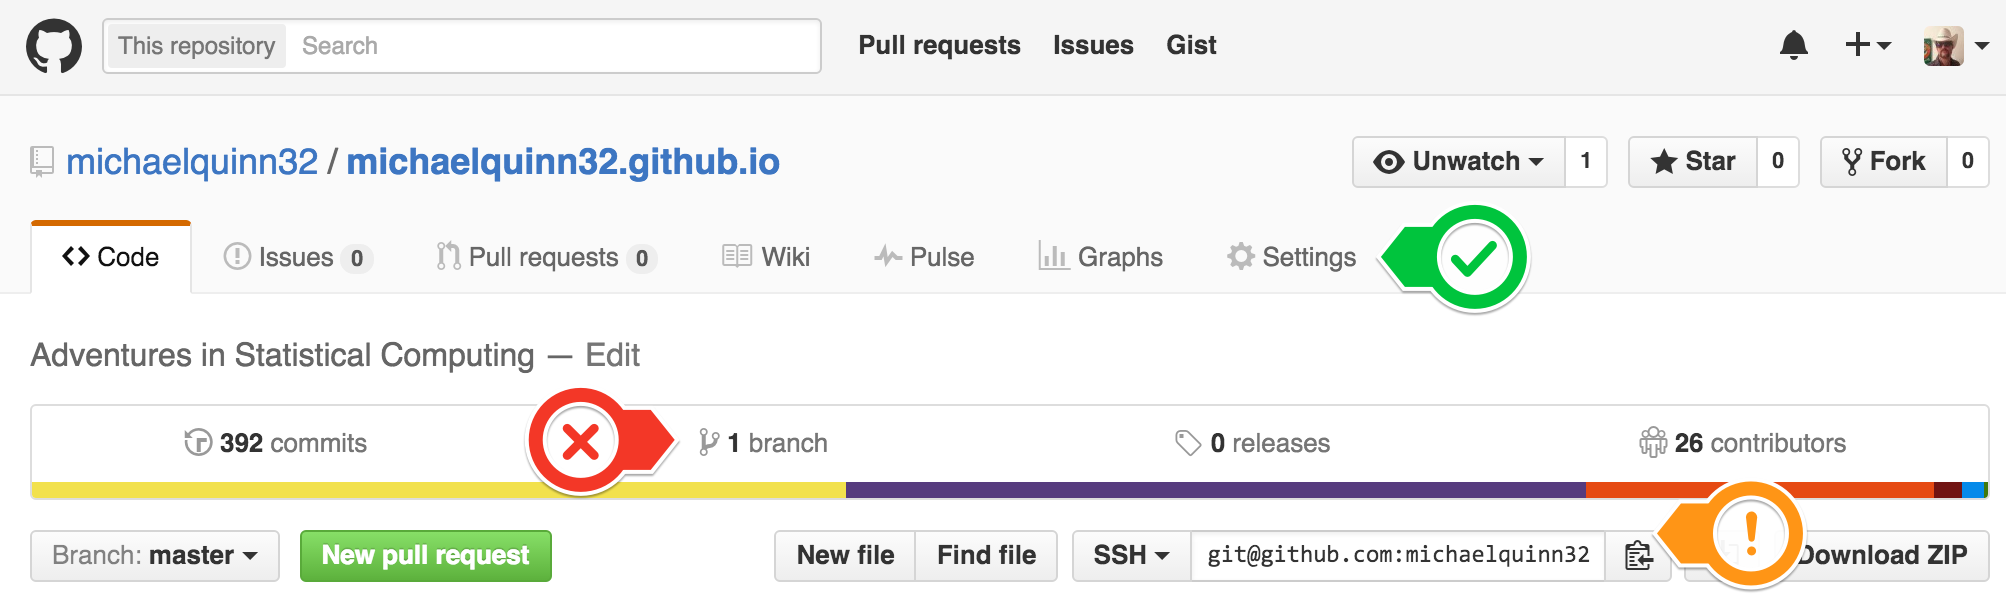
All you want in your Github account is the main branch. Once everything is cleaned up, rename the repo. You can do this by clicking the settings tab. It’s the one with the gear (green pointer). For a personal page, the name of the repository must be your_username.github.io. No exceptions.
You’re ready to create your own local copy, grab the ssh address for your site (orange tab) and run the following in the your terminal.
cd your-projects-folder
git clone git@github.com:your-username/your-username.github.io.git
The rest of the setup mostly involves minimal edits to the _config.yml. Before you do that, I would read the theme setup guide posted by Michael Rose. Feel free to copy freely from my file. Like the rest of the site, it’s on Github. When you’re ready to go live, push your site to Github.
git add -A
git commit -m 'My commit message'
git push -u origin master
Modifying the theme
Prettier syntax highlighting
It’s time to get our hands dirty with some CSS. I’m sure everyone was looking forward to that. I wasn’t, and after the fact, I understand why. The theme has pygments to manage syntax highlighting. There are a lot of different highlighting styles available in pygments. You can see a bunch of them here.
Honestly, as long as you don’t hate Jellybeans, I recommend grabbing my _pygments.scss file and replacing the file in your _sass folder. If you do want to change the theme, a copy and paste from the theme repo above is probably your best bet. When doing this, pay attention to the first few css tags. They are different from standard pygments tags. They handle things like spacing.
If you’re feeling a bit more beastly, you can automatically generate the style sheets from the command line. To do this, install pygments with the following.
python -m pip install PygmentsWith that, you call the following to create the sheet. Replace default with your preferred highlighting style.
pygmentize -S default -f html I also played around a bit with rouge and the function rougify, which generates these style sheets. Unfortunately, this work was for naught, since Github pages doesn’t accept it. pygments is a much better bet.
Last but not least, none of these changes will appear on your site until you push it to the server. I probably lost a couple hours of work on that boneheaded mistake alone.
Installing Disqus
The Minimal Mistakes theme contains all of the components you’ll need to install Disqus for your comments. Just register your site and modify the _config.yml file. The installation code is already included in the folder.
Installing Google Analytics
This is a bit more complicated, and it took me awhile to get running. Go through Google’s guide to setting up tag manager. You’ll end up doing a couple things there, including dealing with search, sitemaps and other small details.
Once you’re ready to install Analytics to your page, create a new file in your _includes folder. Call it _google_tag_tracker.html. Here’s what my file looks like. Then, open up _layouts/home.html and add the following below the very first body tag.
{% include _google_tag_tracker.html %}You might want to install the Google Analytics Debugger for Chrome. I found it particularly helpful to make sure that the installation worked.
Other Tweaks and Tools
Different Page Hierarchy
I wanted some slightly different pages than the default. That requires creating a new folder and throwing and index.md file in it. Here, for example, is my page for personal projects. The major difference from a post is the YAML header, which has the page layout.
Sitemap and Site Feed
I also added the gems for a sitemap and a site feed. That is a small tweak to the site’s Gemfile and some more text in the _config.yml. You need to tell Jekyll that the Gems have been added.
Custom Icons
My images folder has some additional icons and those icons are the basis for the site’s favicon. Along the way, I came across a few different sites for additional site assets.
- The Noun Project is the best resource for icons. The favicon comes from there.
- Superfamous is my favorite resource for free stock photography. It goes along well with the site’s themes.
- Gratis Photography, Unsplash and MMT are also excellent too.
MathJax
I also write a lot of math. To render that into html, I use MathJax. Installing MathJax was simple. I just followed the guide by Haixing Hu. While this process is slightly longer than a typical installation (which just adds a single link), going Haixing’s route gives you both block and in-line math expressions. Just like LaTex.
Haixing’s installation takes two steps. First, you need to create another small .html file in the _includes folder. I called it _mathjax.html. I needed to add one more little piece of code to the _head.html file (also in _includes).
{% if page.use_math %}
    {% include _mathjax.html %}
{% endif %}
Now we have pretty math! Enabling it requires an additional option in each page/ post’s YAML header. The name of the option should correspond to the name set up in the previous conditional expression.
use_math: trueManaging everything from RStudio
Knitr and Servr
We’re almost there. For all intents and purposes, we have a working website. With git, we can publish new posts. But the last step is probably the most important for statisticians, getting our IDE to handle most of the work.
Yihui Xie, the invaluable author of knitr, has been hard at work producing one of the most useful R packages that you’ve never heard of servr. With this, you can take your html files generated by knitr and host them on your own server. Even better, it works with Jekyll. You can learn more about it here.
Getting servr up and running isn’t too hard. Obviously, you need to install it.
install.packages(c("servr", "knitr"), repos = "http://cran.rstudio.com")You also need to add a couple new folders, a build script and a Makefile.
I created a draft_posts folder to hold my work and told Jekyll to ignore it (in the _config.yml file). My finished RMarkdown documents go in _source. Every time I build the website, Jekyll automatically pulls everything into _posts. I don’t need to touch it at all anymore.
The build file controls most of the knitr options. It goes in the main site directory. Here’s mine. Pay attention to things like where knitr will store your images.
The Makefile goes in the _source folder with your Rmarkdown posts. Here’s mine. It controls how knitr and Jekyll work together to convert your text to html. Karl Broman’s guide to make is a useful place to go if you want to understand how all of this works.
All we have left is a few minor tweaks in RStudio.
An Rproject for your website
We’re ready, finally, to put it all together. We’ll take advantage of RStudio’s RProjects, which quietly has become one of the most useful features in the IDE. Want to build a package? An RProject has just about everything you need.
We’ll leverage the RProject to manage our website as well. Since a lot of the site has already been built, we’ll create the new project using an existing directory. Once it’s up and running, there are a few things to check in the page for the project options:
- Under build tools, set the build tools to a
Makefileand set the_sourcefolder, which has theMakefileyou created, as the build directory. - Make sure that
gitis your version control tool. Set the ssh link for your Github repository.
Once it’s time to write, you can use the typical RStudio build tools. To test the current page you’re working on, move it from draft_posts to _source and call “Build All” either through the Build tab (in the top right window) or through Ctrl + Shift + B. The build is a local session, so changes to assets, like images or css files, won’t show up.
For that to happen, go to the Git tab in the top right window. Select all of the files that you’re ready to post and commit the changes. After that, you can push the changes either through the commit window or through the bright green arrow in the tab. The changes are live a few seconds after you push them.
What’s next?
That covers almost everything for getting this site set up. Lots of thanks go out to all of those that built the tools it required (Yihui, you’re a genius), and even more thanks go out to those that posted similar guides online. This guide will be updated as other changes to the site are made, and I’d be happy to answer any questions from readers.
Good luck and let me know how you do!